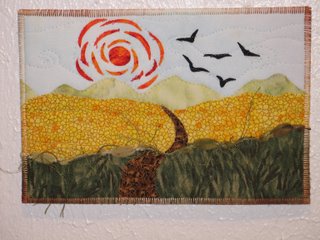
 I joined this group for two reasons - to learn new techniques and to received feedback on my work...I"m new to art quilts and am excited to hear constructive critiques. Size: 9x11. The background is muslin painted with acrylic - pale yellow overlaid with Kansas sky blue. Each layer is a separate quilt. The foreground is fabric that I sewed tucks into and quilted between the tucks. The harvest field is raw edge applique (first time to try this - I like it!) on the yellow field. The tree line is also quilted separately. I have a new sewing machine that can sew through multiple layers - this was the first time to test that feature - worked GREAT in the binding - very pleased with that. My inspiriation for this was a drive through Kansas last week on the way home from a conference in Hutchinson (just north of Wichita). I kept passing these striking fields of sorghum (at least I think that's what it is) yellow stalks with red fuzzy tops. These fields against the big blue Kansas sky were so striking I tho't I need to figure out a way to quilt this. I woke up Sunday am and could "see" this quilt. It's rather simplistic next to many of the ones created in this challenge - but I like it.
Wednesday, October 04, 2006
Harvest Fields
 I joined this group for two reasons - to learn new techniques and to received feedback on my work...I"m new to art quilts and am excited to hear constructive critiques. Size: 9x11. The background is muslin painted with acrylic - pale yellow overlaid with Kansas sky blue. Each layer is a separate quilt. The foreground is fabric that I sewed tucks into and quilted between the tucks. The harvest field is raw edge applique (first time to try this - I like it!) on the yellow field. The tree line is also quilted separately. I have a new sewing machine that can sew through multiple layers - this was the first time to test that feature - worked GREAT in the binding - very pleased with that. My inspiriation for this was a drive through Kansas last week on the way home from a conference in Hutchinson (just north of Wichita). I kept passing these striking fields of sorghum (at least I think that's what it is) yellow stalks with red fuzzy tops. These fields against the big blue Kansas sky were so striking I tho't I need to figure out a way to quilt this. I woke up Sunday am and could "see" this quilt. It's rather simplistic next to many of the ones created in this challenge - but I like it.
Tuesday, October 03, 2006
Fall on Water

I'd appreciate feedback on my quilt, Fall on Water. It's about 12X10 inches, done with my hand-dyed fabric exclusively. (The colors really are better than they are showing up on the computer.) Fused applique, the upper left leaf is the 3D element, attached only at the stem and point, made with wire between two layers of fabric and interfacing so I can "pose" it. I finished the edge with satin stitch (not enough fabric for a same-fabric binding)- that is one element I would change next time.
Thanks for your comments!
Beverly
Just Beyond the Next Hill

8"x11.5"
Sky is unbleached muslin painted with acrylics.
Cotton prints, aiming for a graduation of values and colors. Had to go with blacks and grays as the leaves were lost on Autumn colors.
3-D objects were a variety of leaves from my yard prepared with the
Precious Petals directions.
I used gold chiffon on the front and gold tulle on the back.
Penny Sue Irwin
Leave it to Me
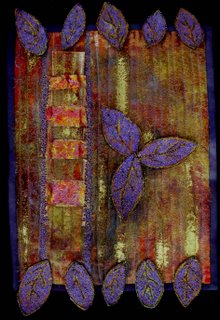
Leave it to me to get it wrong! That was the incentive for the title for this piece. I misinterpreted the 3D requirement.
I layered a piece of hand dyed velvet, painted some bondaweb and fused it to the velvet. I covered the bondaweb with hand dyed throwsters waste covered it with chiffon and machine quilted at 1/4" intervals. I zapped the chiffon with the heat gun to show the colours underneath.
After I trimmed the quilt to size, 8 1/2" x 11", I applied a piece of the background onto the quilt surface which was woven into heated copper shim which I had painted with acrylic paints and embossing powder. I applied some gold leaf in autumn colours to the copper shim once it was stitched to the background. I also painted small areas of the background with Ormalene mixed with superfine metallic bronze powder. I layered black felt and orange silk organza, drew some leaf shapes with bobbin work using Ricky Timms razzle dazzle thread in glitzy purple. I free motion stitched the inside of the leaves with a variegated rayon thread. The quilt is bound with putple hand dyed fabric. The leaves were appliqued after the quilt was finished. I am looking forward to these challenges as I find it difficult to work on a set theme.
Approaching Autumn
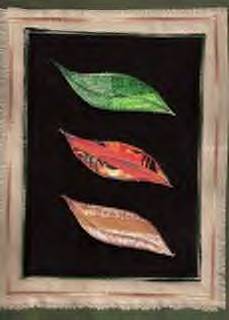
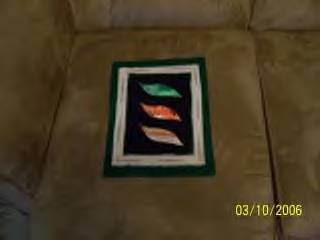 I've called my challenge piece "Approaching Autumn". It is officially fall here in Texas, but won't be able to tell by the weather 'til Feb.
I did not turn on my PC this morning as I told myself that today was the day to just get-er-done! I had no idea what I was going to do. I opened a drawer full of scrappy strips & grabbed the colors representing fall. I set a time limit (very short) to pair them up, most where not straight or trimmed. I chain stitched/pressed/& magic sized them & found another same strip from my pile. I turned this to the wrong side & stitched to the pairs to get 3 fractured colors. I used wonder-under & did the 1st fuse to the strings & set them aside to built a base. My piece consists of 4 layers & a stabalizer. The leaves were fused to a heavy gauge black felt that I ended up cutting in a rectangle. I placed them in the order they would be in nature, turning to fall, & fused. The black was put on a burlap layer, then placed on the background layer of dark green felt. This importand element did not show up in the pic very well & I will try to correct this when I get some natural lite with the camera.
The leaves where machine appliqued with corresponding variegated thread. The black layer satin stitched on the edge, & the burlap was satin stitched inside the edge & was later frayed to add a bonus element.
The piece is 10x13 & has no binding. It will be hung by a twig.
I believe that the criteria for the challenge was met by the use of color, multiple layers & stitching. The idea being simple, minimalistic, & I did not add any beads or other embelishments thinking that it would distract from the floating of the leaves.
Hope all the other newbies are having as much a I did, & since I didn't use but a small fraction of the strings, I may be able to do another piece.
Sunday, October 01, 2006
Moonlight Musings

Ok,,throwing myself to the lions here...LOL
8x10.5"
cut the entire silhouette out of black fabric, placed it over the orangy background and then appliqued the closer leaves on... stitched around all the leaves with green metallic thread, and quilted the rest with black and invisible threads...
not quite sure if I met the 3d part of this challenge..I thought the boy's figure would do it, but since technically he is flat is he still "3d"?
Falling Leaves
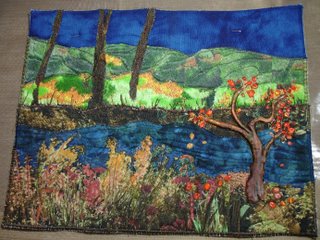

Falling Leaves: 9.5 x 12 inchesI tried to achieve depth several ways, by perspective, by layering and adding a dimensional tree in the foreground.
Comments?
Katherine
Autumn Shimmer
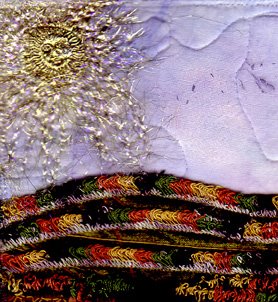


The photo was the inspiration for Autumn Shimmer.
As with all inspirations, I choose what I wanted from the photos and discarded the rest. The trees on the treeside are made with a fringe foot, which is also called a tailor tack foot. The fringe foot allows the thread to form loops over a metal area of the foot. It is open in the back so the fringe slips off easily.
The sun is made from bondable Angelina fibers. The fibers will bond to themselves, but not the rubber stamp that was used to make the impression. I stitched the sun to the quilt using invisible thread and left some of the threads of the angelina that was not bonded to the stamp form the sun rays.
I choose a journal size to work with, so the quilt was finished in a couple of hours. What Fun.
Priscilla Stultz www.priscillastultz.com ebay store: priscilla's creations
Road to the Sun
Wednesday, September 13, 2006
Welcome to the Fast Friday Fabric Challenge Blog
This blog was created to give the group members a chance to show their challenge pieces and to receive *constructive* critiques.
If you are a member of this blog:
- Post 2 or more photos of your quilt. One full view and one close up is preferred, but feel free to post as many photos as you need.
- Write an artist statement: tell us about your quilt, your inspiration, your favorite parts of making it, your struggles, about the materials and techniques you used.
- Include the size of the finished piece, the artist name, the link to your site, and anything else you would like to add.
- Ask questions of your fellow quilters if you have any. If you want to know if they like the green you used or if the beading is effective, ask the question.
- When you post a quilt, you have the option of having the critiques posted in the comment section or emailed directly to you. Click the "Post and Comment Options" tab at the bottom of the compose screen. There you can disable comments. At that point you would need to create a hyperlink with your email address. If you need help, just email me. Be aware that some people may be rude and spam you, falsely writing negative comments about your quilt. It is up to you to decide which option is best for you.
- All comments to this blog are moderated! So if someone writes very negative things about your quilt or in any other way spams this blog, no one will see them.
If you are a member of FFFC group and would like to be a member of this blog, please email Julie and I will send you the invite.
If you are here to critique:
- Please leave your critique in the comment section (though some entries may prefer you to email them directly).
- Write the critique with the intention of helping a fellow artist improve his or her work.
- Do not be rude or in anyway spam this blog.
- All comments are moderated, so the quilters will never see nasty critiques.
- Read the "how to" suggestions in the right hand column. Those should help you offer a constructive critique if you have never written one before.
- And please join our group, FFFC! If you would like to try art quilting we would love to have you!
