Showing posts with label Ann E. Ruthsdottir. Show all posts

Thursday, February 20, 2014

Blue Rose

Blue Rose Center

When the 'Coming Up Roses' exhibit was announced, I choose to create this blue rose.  I decided I needed to post before the next challenge comes out in two days.

I wanted to create something dimensional.  This is my first try after seeing the wonderful dimensional flower quilts by Barb Forrister at Houston last fall.  I also attended her demo and got to meet her.  What a thrill.  She makes it look easy.  However, I found I ripped out a LOT.  If I had more of the blue satin, I would have just cut more.  Having a limited amount of fabric really pushed my creativity.  

I have been experimenting with different ways to finish out the quilt.  I have already thrown out three tries.  Because of my fabric limit, I try ideas out using other fabrics.  However, for me, the blue satin is the only fabric from my stash that works. Perseverance is the name of this game.

Monday, December 23, 2013

Butterfly Mobile


When I saw the mention of butterfly mobiles I got excited and inspired.  The first butterfly took 4 days.  I used florist wire for the stiffening.  Unfortunately, it is not strong enough to do what I wanted.  I have already made wings for 7 more butterflies.  Not sure how I will handle those.  For now, I hope you can imagine the movement.  Because they are so light weight, it takes very little to set them in motion.  That is my favorite LIKE about this project.

Sunday, August 11, 2013

Fantasy Book Cover

Cone Flower
Framed 10" square
  
Because of my love of plants and gardening, I have many gardening books.  My frustration with all of them is that they try to cram too many photos or a photo of too many plants on the cover.  Because of this, I decided to create a book cover that I would like to see.  I also was so fond of my idea, I thought it might make a nice series.  However, because of the strictness of my design, everything had to be exact.  It was much easier on paper than fabric.  Paper doesn't stretch and move, sometimes with a mind of its' own.
 
Because my original photo was very busy with other flowers, it had to be painted over a LOT!   I used tiny, iridescent seed beads on the top of solid small seed beads.  Those glaring dots in the photo are reflections of light.  I stretched the center of the flower with the round handle of my scissors.  Then I beaded it and stuffed it.  After mounting on the foam core, the perimeter of the 'cone' didn't want to lay flat.  I stitched the edges down with clear poly.  Now it has the depth that I wanted.  I like a lot of depth and texture.  I first stitched the petals to one layer of poly batting and a thin backing.  After stitching all of the petal veins, I cut around the petals so there was no batting between.  Then I made the usual layer of top-batting-backing.  I re-stitched around the petals so that they would have dimension.  Then I quilted the rest of the piece.
 

Saturday, February 23, 2013

Cottage Door

Cottage Door, 4" x 6"
 
When the FFF Challenge came out, I was excited.  I had taken about 1,000 photos in Carmel between Christmas 2011 and New Years Day 2012.  I was so disappointed that the wedding photos were so awful, I had just stuck the album away on my computer.  Now, I had an excuse to examine it. 
 
Friday evening I went through lots of building, door and window photos. Finally, I found this little turquoise door which held me enchanted.  I printed it using my Epson pigment printer late Friday night.  I thought I would just 'stitch it up' in the morning.  Almost 12 hours later it is done.  In person, it is tactilely dimensional.  I stitched in layers similarly to what I did in 'Nine Patch in White'.  http://designerann.blogspot.com/2013/02/nine-patch-in-white.html
 
I love the idea.  However, I thought I would go nuts stitching the window panes.  I will NOT be doing that again.  I got very tired of the stitching when it was only about 1/3 done.  Hopefully, it is a lesson learned.
 
Although I like it.  It was way way too too much work for the final result as a post card.  I think it would not have been any more work to make it in a larger size.

Wednesday, February 13, 2013

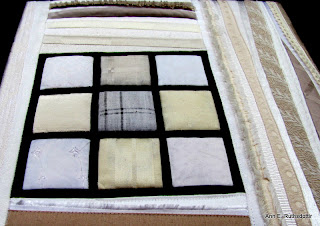
Nine Patch in White

Nine Patch in White
Framed 12" X 12"
 
I am really enjoying exploring the ways that texture and depth can be explored.  Besides the raised nine patches, I have used fringed selvages, cording, and decorative trim.


Texture View
 
I double batted the squares so that they would stand out.  I also used cording, selvage fringe, and decorative trim.  All of the fabrics are full of texture.  This is a darkened version to show the texture.  I pulled threads in the center square to create the pattern.

Friday, December 28, 2012

One Yellow Square

One Yellow Square
10" x 10"
ready for framing

One Yellow Square
view to show depth and texture

I had a dream last night about creating a quilt with one square.  I thought it would be red, but I was not sure.  This dream puzzled me.  I wondered what the FFFC would be.  When I finally got my computer working, I got goose bumps when it was something to do with numbers. 

After reading all of the information, looking at all the sites, and finding out by my birthday, my number was 2 I was stymied.  I've been making charity quilts non-stop for a few weeks now.  I'm bored.  Don't get me wrong.  I enjoy knowing that they will be going for a good cause.  However, the sewing to a set pattern is wearing very thin.

This challenge came just in time to exercise a bit of creativity.  I had purchased some plain and non floral fabrics before Christmas.  Now they were all washed and ready to be used.  As I read the descriptions, the number 1 made the most sense to me = power, passion, determination on one view as well as "... developing your own will, individuality, decisiveness, and expressing your creativity,..." on another view.  Of course I could not get the dream out of my mind.  Above is the result.

PS.  Does anyone know where to buy good quality metal frames at a good price?

Friday, November 30, 2012

Golden Swirl Cushion

Golden Swirl
 
I got the idea for the design while cleaning. My hanging chair had the cushion I made ~ 40 years ago. Then it blended with my colors; now it was an eye sore.  Because of my tedious construction method, I spent three days working on this before I attempted the cording.  Unfortunately, I did not check the fit before I added the cording.  This is the first time I have ever attempted cording.  It took me one lone evening.  As you can see, it is still not finished.  I'm adding it to my pile of UFO's so that I can return to my bed quilt project.  If each of us made just one bed quilt for Sandy victims, we could cover half of the families.  These are going to the folks who have lost everything.  I think they need a bed quilt a bit more than I need a cushion.

Friday, September 07, 2012

A Friendly Family of Five Fabulous Fish

A Friendly Family of Five Fabulous Fish
Frequently Travel with Two Terrific Tag-a-longs
36" x 47"


A Friendly Family of Five Fabulous Fish
Frequently Travel with Two Terrific Tag-a-longs
36" x 47"

When the Fast Friday Fabric Challenge came out = a group of something, I got this fish idea.

Since I am very behind in my charity quilts, I wanted to 'catch up'. I also have a 'guild summer challenge due September 13'.  This quilt serves all of those purposes. I would really like to know the age and sex of the person who picks this quilt. It is very unlikely that this will happen. I just hope it makes the recipient smile.  It was a LOT of FUN to make.

Because I am thinking it may be washed a lot, everything is faced and stitched down tight. There are NO raw edges, loose threads of anything that might 'wash out'.

Thursday, August 16, 2012

Blue Horned Violet


9" x 9"

My Mom's favorite color was blue. My dear friend Deborah also likes blue a lot. Thinking of both of them as I debated how to respond to the latest FFF challenge of a flower in the mode of a painter. I chose to do a Horned Violet ala Georgia O'Keeffe. I also remember when I transplanted a LOT of these violets around a large bush in our back yard. They grew and thrived; maybe too much. However, Mom loved them. Precious memories.

Since I lost my Mom on July 20, I've been struggling with a LOT of emotions. This challenge and the thread painting [which was boring], has helped me cope. Deborah's birthday is August 16. Hope she likes this little 'painting'. If she doesn't she can choose from something else that I will be creating in the small category. I will be creating many more small items for a one person show next year.

Tuesday, July 17, 2012

Monogram - Tangled


Since the FFF challenge was to do a letter, initials or monogram in a zentangled manner. I did that for the piece that will go on the back of the memory quilt pillow for my second cousins. Originally, I was just going to use the same fabric as the front. After the FFF challenge came out, I thought it would be really special to use their monogram. However, after the tangling was finished, I think it would have been better without it.

Wednesday, June 27, 2012

Wedding Memory Quilt

Wedding Memory Quilt

I wanted to make a small memory quilt in appreciation of the wedding invitation. I figured I would just stitched them as a straight top with filler between. Then when the FFF Challenge came out, I totally changed my thinking. This Gestalt challenge made a BIG difference in my design = turned it upside down. I wanted the photos to look as if they were casually dropped on a table. Of course, they were carefully arranged according to the Gestalt principals of Similarity, Proximity, and Alignment.

The Wedding Ceremony Booklet top is on the top, touching the family, who are now united by the marriage and the couple. The wedding group photo is on the bottom of everything, because although important, it is subservient to both the couple and the family. The father-daughter photo is parallel to the couple [they are still close, yet have a very different relationship], but not touching. I chose this photo of the couple as they were both intently looking at each other. The small center bottom photo is of the couple lighting the unity candle, another symbol of their pledge of troth.

I had this all laid out 2 months ago when I took it to a guild meeting and someone commented, "Those photos are very antique looking. Why don't you just tuck a little lace under to complete the look." Wonderful suggestion. However, it is not that easy "to tuck a little lace under". The corners need to be square, matched and aligned. I also was unsure of the fusing medium, so when I asked the quiltart group, I found I needed to use Mistyfuse Ultraviolet. So then I had to wait for the mail. Then life interrupted. Now, happily, it is finished.

Monday, March 26, 2012

Golden Sunrise

Golden Sunrise, redone

Not happy with the quilted sky, I ripped it out.  I was not happy with it when done.  However, when someone commented on it, I knew I had to change it.  Now it is tied with gold metallic thread in a circular pattern around the sun.  I like this much better.  Luckily, I have an ergonomic seam ripper.  I've used it a lot.  However, ripping our clear poly thread is the most difficult.


Golden Sunrise
10" x 10"

This is my third try.  I was really happy with it before quilting.  I think the sun would have been better not quilted.  What I really enjoy about all of these challenges [besides the challeng] is looking at all of the wonderful art references.  I do remember a Turner titled 'Fire at Sea' or something resembling that.  I could not find it online, but it is still in my mind after 20+ years.  I think art is like that; it grips you and holds you.

Tuesday, February 28, 2012

Window Study 1

Window Study 1
10" x 10"

The edge is gold lame. It is very difficult to photograph because of the sheen. If I made it more yellow, as it really is, all the other colors would be distorted. My final choice of fabrics was limited to what I call "lush". Those are fabrics like satin, velvet, textural upholstery, recycled ties, etc.

Photo Inspiration and Tracing

I originally did 7 panels. Hated one; into the circular file. I made each one individually as a separate little piece. When I finished, I re-arranged the panels because I like them better this way.


Color Evaluation

Color Inspiration was from a photo of fireworks over a body of water. Because I did not have rights to this photo, I'm just showing my color study. Obviously LOTS of bright colors.

Left Overs

My process was to get out my scraps and pick out those I thought might work. This is the pile of pieces that I picked out of my bags. I do think I should do something with this HUGE pile of bits and pieces. Found fabric scraps I had forgotten about. Lots of memories in this pile.

Thursday, February 09, 2012

Fat Cat and Mousey


Fat Cat and Mousey
32.75" x39.5"


Fat Cat, close up face and tail


Fat Cat holding Mousey, close up

This challenge was so much fun for me.  I really got into the idea of creating as a child.  At the same time, I was creating for a child.  Once I got the idea, I just dove in.  Piecing was not dependent of fabric grain or exactitude.  It was just all FUN! 

The horror came when I turned the quilt over and saw a mess from quilting on the back.  I glued all of the stitching down.  Thus, what started out as a comfort quilt for a child became a wall quilt that will hopefully be wanted by a hospital for the children's wing.

I am really having a hard time writing this because I am very depressed after my guilds non reaction to this quilt.  I was hoping for an 'atta girl' or two, but that was not forthcoming.  Usually I am very 'high' after a guild meeting.  Not tonight.  Not sure I will show them anymore quilts that I am so emotionally attached to.  It is all a journey; I learn as I go.  This group has given me such inspiration and wonderful learning experiences, it is one of the BEST parts of my quilting journey.

Saturday, November 26, 2011

Onion Peel


The Art Piece

As I started this design, I had in mind that it eventually would become a purse. I was given a gorgeous piece of burgundy velvet [my friend Alex bought it at an estate sale for 50cents], I had some tiny cones of silk yarn, some iridescent seed beads and an idea. I had never done any couching before, but this silk begged to be put with this velvet.  I also felt it really fit this challenge.

Velvet seems to have a life of its own as it slides and frays all over the place.   I stay stitched the velvet to the stabilizer. That seem to keep the velvet in place.   As I began to couch the silk yarn to the velvet I loved the look. It is lush! I had absolutely no idea I was stitching the shape of an onion cut pole-to-pole; I just liked the shape. It wasn't until I took a break for a dinner of my Oven Roasted Onion Soup, http://designerann.blogspot.com/2009/05/oven-roasted-onionsoup.html , that I realized after peeling and cutting over 4 pounds of onions, that shape was definitely in my mind.

After dinner I added the seed beads to bring out the dimensions of the velvet-polyester batting-satin layers. I used the polyester batting because I wanted it to be  very 'lumpy'; it is.  It is also very rich, lush, glowing and invites touch.  The beads are dark, but just the right tiny glow to fulfill the challenge. Today I finished making this work of art into an Arty Purse. I plan to use it New Years Eve at a wedding rehearsal dinner.  I often make things do not materialize into my inner vision.  It is so nice to make something I really like.

The Arty Purse Hanging on My Design Wall


The Arty Purse Sitting on a Table


Monday, October 10, 2011

Purse Inspired by Mondrian

Inspired by Mondrian

For a couple of months now I've been working on this challenge, interpreting an artist's style. I decided to go large. Although I still want to finish that project, I decided to try make something small in the mean time. 

I used recycled wool jackets, skirts, and odd bits of wool that I felted in my washing machine and dryer. It is really soft to the touch. Felting seems to take out all the rough stuff. I added grosgrain ribbon to cover the seams; wider grosgrain as the final edging. All was stitched down with zig-zag using polyester thread because I both wanted to cover up the grosgrain and add a sheen. I first tried to use another stitch on my machine, but after many, many birds nest on the back side, I decided the zig-zag would have to do. The lining is black satin: pocket on one side for my cell phone; pocket on the other for my charge card case.

Yes, it was a fun project!

Monday, September 26, 2011

A girl just wants to have FUN!

I was inspired by Sue Church's, "Joyful, Joyful".   http://fastfridayquilts.blogspot.com/2011/09/joyful-joyful.html

My colors are all bright, lush and/or shiny with the bits of lace, buttons and ribbon adding a bit of whimsy.  To me, the mood is FUN.


Pajama Top to match these bottoms


Sunday, June 12, 2011

I named it 'DONE'

I started this little piece last spring. Then I had a series of medical interruptions. It was started for a Fast Friday Fabric Challenge titled, Art Deco. I think my original design hit the mark. All I intended to do was stitch in the ditch so the design popped. 
Pieced Design

However, I could NOT get the tension adjusted on my machine. The more I stitched, the more out of whack it got. I had lost a LOT of my incentive for finishing this. Yet, it was something practical I really wanted to finish.
After marking a bunch of circles flowing across the design, I stitched those several times around using white thread until I felt they stood out enough to make the design show. It was rather subtle. Next, I picked out a thread color that is in my wall. Then I really stitched it within an inch of its' life. Now the real FUN began. I took out my buttons. No real whites, so I used these small off white ones. I really wanted gray and purple. I had bought a set of purple buttons and also some tiny gray ones. I needed something that would POP. Like any good Artist, I looked in my closet for buttons that would work for this quilt. I absolutely love the steel gray ones. I rarely wore the wool jacket. Now I have more wool for wool stash. I found a few more purple ones on a sweater I never wear. That will be re-purposed later.
Completed Design

I laid my buttons out on my design; then I fiddled for hours. I held them in place with the yellow headed pins. I liked the accent, so decided to use white embroidery floss on all of the buttons. I actually only had to take off one button that didn't work out. That amazed me. This is my first time using buttons as a design element. Attaching them took 2 days because I had to pull the large needle through with pliers. The tiny gray ones required a small needle, so I just went through several times.

Finished Design in Situ

Am I hooked on buttons? Not sure. I think each quilt will have to speak to me and tell me what to do, just as this one did.

Friday, May 13, 2011

Fern Reliefs for FFFC

This is my answer to the latest FFF challenge. Not sure if it really fills the bill. However, I really had trouble understanding the challenge, so this is what I came up with.

Like many of you, when I read a challenge, I get many ideas in my mind. This time I had a real block. After seeing some of the offerings, I got the idea for these ferns. I used real ferns, flour paste resist and then very close quilting.

Two Ferns, 11"x16"

Three Ferns, 11" x 16"

Comments are always appreciated.

Tuesday, March 29, 2011


Red Rhythms
Charity Quilt, 28" x 29"

This months Fast Friday Fabric Challenge is dance and movement. Since I have done several ballet pieces = LOVE BALLET. Ballet Trio is one of my favorites http://designerann.blogspot.com/2009/01/my-world-in-black-and-white-entries.html
[you have to scroll down], plus one of my very few abstracts, http://designerann.blogspot.com/2011/01/spinal-dance.html.

I thought I should do something different + I wanted to make something that could be a useful piece for a charity. I wanted it to be 'happy'. I had a lovely piece of red which is the back as well as the moving pieces. I used yellow and light blue for contrast. I used as many different fabrics as I have. I thought I had a pretty good stash until I tried to find some variety. Funny because I know I have very little green, but thought I had a lot of blue. This is a very good reason for stash building. [You have my permision to use me as a reference if the need for stash building is ever questioned.]

After I had completed all of the extra red stitching, I realized I had the pressure too high and thus there is some unintentional movement of the fabric.

It is done. It is warm. It is colorful. It is the best I could do. It was done with love.