Showing posts with label Challenge 21. Show all posts

Thursday, June 26, 2008

Deconstructed Log Cabin


I started with a "liberated" log cabin made from fabrics in my scrap bag. Then, I stamped it all over with two colors - the gold didn't show up so I over stamped it with black. then I cut it up and sewed it back together mostly with 1" strips so I could maintain the original size.

Tuesday, June 17, 2008

Purple Mountains

17" x 18"

"Before" is actually the FFFC effort for Challenge #8 which I didn't like well enough to even post. I had, however, loaned it to a friend who loves purple so much that she has named her insurance company "Purple Ink" -- anything purple goes on her walls or shelves -- and I only thought of it this past week. I think she'll like "After" even better!

My thought of what to do with it came in the wee hours of wakefulness one night. My original intention was to put in the wavy diagonals in one direction, then cut it further to put another set crossing those, but decided to stop after the first set.

I'm not sure of what I want to call it -- suggestions welcome!

Monday, June 02, 2008

That Dog "Gone" Quilt

My UFO was made from a ugly fabric exchange. (the little flower's red,orange,yellow,green...ugly?). I folded the UFO in half and cut wedges.


Wedges from both sides of the UFO are in both fans. In my stash I still had some of the dog fabric....I scattered little dogs around That Dog "Gone" Quilt and on the ends of the fans with a fusiable and stitch finish.I also used eye-lash yarn around the fans.
I'm not sure if I like the UFO or That Dog "Gone" Quilt better. (Done is better!!). I know my quilter friends here in Marquette would be upset with the cut up designs on the fans. I like the idea of cut and sew you never know what you will get....
Janice

Saturday, May 31, 2008

Cityscape


I have posted my finished quilt Cityscape - I took two little building quilts I had done - but wasn't really happy with and cut them up for Cityscape - finished size is 26 x12 1/2. It's not quite done - still needs binding. I put on some borders to square it up.

Actually I've been doing this for a few other quilts as well - taking something that wasn't working and making it more fun.

Lisa
In Sunny Seattle

Oops! I Goofed!

The quilt that I began with was from another challenge. The challenge was to use Gerry Baptist's Heat of the Afternoon painting (http://en.easyart.com/art-prints/Gerry-Baptist/Heat-of-the-afternoon-101877.html) as a starting point. From there we were to use a small viewing window to take a small section and turn it into a quilt. When I finished my piece I hated it. I was ready to throw it in the garbage!

I pulled it from the bone file for this challenge. Took my rotary cutter and had great pleasure cutting it up! Then I decided to try weaving the pieces together. Wasn't happy with the result. Grabbed a piece of batik that had similar colors and weaved again. Better. Still not happy. Decided to play with some threads to secure some of the edges. Decided I like it better. Had a scrap of fabric that looked like a border. Yuk. Needed somthing more. I'd just taught a class on "Getting Comfy with Color" where I'd mentioned some colors, like yellow, make great accents. Added the yellow eyelash border.

Finished machine quilting the center and wentto even the borders when I realized I had done an incredibly horrible "oops". So bad there was no way to correct it. Remembered I had told a student to follow Tim Gunn's advice: Make It Work.

So I did.

Unless someone spends a lot of time fondling the quilt the oops may never be discovered. I may confess one of these days. It will definitely make a great teaching sample for my classes!

What do you think about this deconstruction and reconstruction? Finished size is 18 1/2" x 19".

-- Joanna Strohn

Friday, May 30, 2008

Challenge #21 Rhoda Forbes


Wheww, just under the wire. I've finished my challenge piece and must say this was so much fun! I used a small wallhanging that i wasn't at all pleased with and started slashing it. I then added some funky flowers in the right hand corner and a bit of writing 'Be still and feel the moment'. And isn't that what we all need to do these days, especially up north where our summer is so short.
Anyway, I must say I will bge deconstructing a few other pieces that are hanging around. I didn't put a lot of thought into this piece, just started cutting it up.
When it was done I thought of the business that interfers with my quiet time enjoying the flowers. Thank you Linda for the great challenge.
I look forward to critique from my peers.

Apple Peels


I started with a sweet little one-patch quilt top, slashed it and inserted green, red, and orange strips, then cut it in fourths, swapped out the northwest and southeast quarters, and then sewed it back together. Then I fused on some red spirals left over from the spiral rose quilt I'm working on (Ann Fahl's pattern) and called them apple peels, because of that one light square in the whole quilt. Machine quilted the background, and used red rayon thread in a zig-zag stitch on the spirals - oops, apple peels.
It sure looks different!

It was a challenging challenge!

The finished quilt measures about 15" x 19".

Critiques are most welcome.

Nine Path by Penny Irwin


8.5"X 11" Made from several abandoned 9patch blocks. I randomly cut them apart and selected a few to re-assemble on some black Kona.

Out of the nine patch - Into the Garden


What an interesting challenge this has been for me. I got a late start, but made up some time with this UFO I had made about two years ago. It was based on the 9-Patch Pizzazz book by Judy Sisneros, however my effort lacked the pizzazz (boring even). I was happy to take the rotary cutter to it.
I first cut it into strips, and rearranged them, but really started to hate the light fabric that was on the ends of each strip. I whacked that off and started to play with the strips as borders, added a center panel, and then some fused appliqué and the piece started to take shape. It is all quilted now and ready for some embellishment, and I would like some suggestions as to how to bring this piece to an increased level of interest. One can’t yet say it has pizzazz, however I do like it more than the original. Any help would be greatly appreciated. I’ll post again when it is complete.


Thursday, May 29, 2008

"Midnight on the Porch"


I took an old UFO, originally made for a black & white challenge. After slicing and shifting, I added some inset wedges and a bit of textured yarn. I think it worked - what do you guys think?

The top picture is the original. the middle is the new work, and the bottom is a close up.

Wednesday, May 28, 2008

Town House with a Country View


I started with a top I had made about 5/6 yrs ago in a class. I just never knew what to do with it, knew it needed something and I always thought in terms of applique. Just never got to it.
So I cut it up... I am afraid I did use a ruler. Then I just got started with 'things' that I have been fiddling with, like stencilled leaves [shiva sticks] and it went from there. I tried painting ... again with Shiva Sticks, but I didn't like the results, so cut it out and used that african animal fabric to cover the holes..from the back.
It is quilted, painted, appliqued and bound... held together by tabs.

Cynthia, if you see this, you may recognize my inspiration source...
the Dreaming in Color quilt by Linda Kemshall and just 10 pages before your Focus on Fungi.
I always look at your piece but somehow... nothing happens.......
I just love it and someday.....maybe the pieces will fall together.
BTW the book I am referring to is Quilting Masterclass....Inspirations and techniques from the experts........ by Katharine Guerrier.

So, I found it a challenge. fun and while I am surprised by the 'sameness as I put the pieces back together [it was not my intent], I do like the end result.

My Townhouse with a Country View.
Thank you Linda.....
Carole

Reconstruction


Original piece, top photo. Reconstructed piece, bottom photo.

Well, I finally had a chance to get a challenge done this spring! I sliced, I diced, I twisted and turned. I'm still not totally enamored with the thing, but I think it's better than the original version. I like that there is more movement in the piece, and although I'm still not crazy about the couched yarns, I think they look better integrated in the after piece.

The original was already finished about a year ago; I think it was a companion to another challenge piece, so when I sliced and diced, I simply overlayed the quilted pieces and topstitched them together. I put a new layer of stabilizer and a new backing on the back; added a bit more quilting to hold it together, and covered the exposed edges with more couched yarn. The fabrics are overdyed vintage kimono silks which were originally fused. Construction-wise, I don't think this one will hold up real well, as the silks are already starting to fray, and I probably signed their death warrant with all the additional stitching.

This was a good exercise. I have done a little slicing before, but not to an already completed project. Thanks Linda.

Brenda Jennings

Tuesday, May 27, 2008

From traditional to pictorial

This original piece was constructed some years ago. It was actually always meant to be part of a pictorial quilt - it was supposed to be a "quilt within a quilt". It is a little hard to explain but the reality was that once finished I realized the scale was too small for what I was trying to do so I started over. I had put so much time into creating this little miniature that I couldn't throw it out even though, knowing it was to be part of a bigger picture, I had not put the attention to detail in it that would allow it to stand on its own. So it languished in the pile of "almost made it" quilts in the sewing room for the last 7 years or so. Then along came Linda with her deconstruction challenge and I decided it was finally time to do something with it. The lupins are blooming in the West right now and the colors were perfect so I chopped up the original and added some flowers. I am pleased with the results and happy that I now have a finished piece instead of an "also ran"! Let me know what you think!

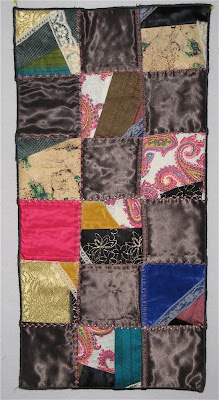
ren's deconstruction


This is the ugly crazy block that I had lying around.


This is what I ended up with, after adding some horrible-to-work with satin-like stuff and one piece of delightful-to-work with pink silk.

I don't know...what do you think?

Flood Receding


This was interesting. It is the first time I've tried deconstructing. The original is a sample I made from a pattern by Ruth McDowell in "The Experts' Guide to Foundation Piecing". I wanted to see if I liked her method. This was just a little piece (10" x 7.5"). I knew I'd never do anything with it---not my own design. However, I AM working on a quilt using her method.

Flood Receding (8 3/8 6.5) is my deconstructed piece.

Satori


Finished Piece: Above
Sacrificed UFO Collage: Below


This challenge started with a UFO fabric collage. It has been deconstructed to smithereens and is kind of difficult to see in this month's challenge piece. The finished piece has ribbon, cording, and silk leaves in it. Also, it features strips from a fabric weave in contrasting colors. There was no plan in the design. One step just seemed to lead to another and voila! Comments are welcome!

Monday, May 26, 2008

Doorways by Cynthia Ann Morgan

Earlier this year, I made a piece based on the ruins of a Thai palace...and I ended up cropping a big section off one end. So that was my starting piece. I had a bunch of quilting samples and other pieces I had cropped off, which I used to build onto the piece. What do you think?


The Embedded Series


In 2005, I started a series of "embedded quilts." The starting point was 18" sq's of hand dyed fabric, on which were appliqued a variety of shapes in different sizes. After the first 6 were completed, I realized I just wanted to cut them up! Which, of course, I did.

The first one used 5 blocks of circles and 1 block of triangles and is, by far, my favorite. The second was 5 blocks of squares and 1 block of circles. The third (not pictured) was all circles and far less successful. All are heavily machine quilted.

This experiment became a class I teach locally, and in 2 sessions, most students have their tops constructed. The best one was all oranges and fushias (of course, from the accerlated student)! I'm hoping to have time to do a new piece for this challenge, but right now am on 2 deadlines and sewing my little heart out!

Sunday, May 25, 2008

Going Around in Circles


I had to do this in three steps instead of two.


For step #1 I pulled out some two year old orphans, added blocksbetween them and made the top. It was predictible and boring but not too bad.


For step #2 I cut it up and added another fabric. I hated it. Myhusband, who is very supportive and likes most things that I do came into the room and said "That is the ugliest thing you've ever made". I had to agree. I was pretty discouraged for awhile. I auditioned some things that didn't work at all and then I remembered I had some iron-on bias tape.


So, for step #3 I added the tape, cut it into a circle and came up withsomething completely new. .Betty

Saturday, May 24, 2008

GALACTIC EXPLOSION


I had to create a new top as I had no UFO's to work from. When I finished assembling it I really liked it and had a very hard time making myself cut it apart, but I love the way it turned out. I think it really made the design. The "planets" are all sheers, raw edge fused. I just went for it with the rotary and cut whatever felt right and then stitched the pieces to the black background and around the circles to quilt it.


This was really fun. I just may try deconstructing again (and not be such a wimp about it...LOL).

Thanks for a great challenge Linda!


Comments welcomed :-) Cherie