Showing posts with label laura west kong. Show all posts

Wednesday, June 01, 2011

Miami 1920

Posted by PicasaMiami 1920
This is really a fun challenge. My quilt started with an Art Deco, marble candy dish. I used the figurine who sits on a marble stool as my model. I incorporated the image onto my background with an imaginary hotel sign. On the background I use oil based paint sticks, a yellow highlighted marker, embroidery and metallic threads, thread painting, stifle free motion quilting, as well as some hand stitching. To bring the piece together I framed the quilt with some trim from my stash. The letters HOTEL actually glitters with the help of a very shiny thread.

Thank you for such a great topic.


Friday, March 04, 2011

Breezy

Breezy by Laura West Kong


This may be the record for slowest ever FFFC quilt. Here's my quilt, Breezy, from challenge #1.

The batik petals are machine appliqued and the wool felt leaves are hand beaded and appliqued with rayon embroidery floss. Breezy is sashiko hand quilted with topstitching thread. At 15-½" x 33-½" there wasn't much chance of my finishing all that in a week, but I'm glad I waited to do it the way I imagined it should be. ... Now I'm a wiser Fast Friday quilter.

Breezy, detail

Monday, July 26, 2010

Magritte and Me

Magritte and Me
17x23" (challenge #46)
by Laura West Kong

I've been experimenting with fusible "brush strokes" of fabric to "paint" a picture with fabric instead of paint. This is my second attempt at this technique.

I scheduled this quilt to take a week, but due to a shortage of Lite Steam a Seam 2 in my personal quilt stop, aka stash, it took about a month. I have got to have a talk with that store manager about inventory shortages. ... Oh yeah, that manager would be me. ;-)

Here's a detail of the castle. I don't think I could live up on a floating rock like that if such a place existed, but it would make a fabulous location for a studio, surrounded by the sky and the sea, and no place else to go.

I've always loved Rene Magritte's painting, The Castle of the Pyrenees. In fact I liked it so much I did a reproduction of it in a painting class, and I used my painting as the reference for this quilt. You can see my painting and find out more about this quilt at my blog.

Tuesday, August 26, 2008

Breaking Free

by laura west kong
approx. 18" x 14"

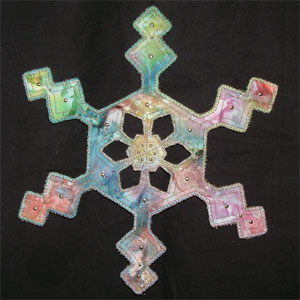
I wanted to work from a life drawing rather than a photo for this challenge, and chose a single element that might be found in a garden, one not so scorchingly hot as my own ... a pine cone. First I made a rough sketch of the pine cone, focusing only on the triangular tips of the scales that seemed to jump out from the shadows, then stylized my drawing slightly.

While fusing the scales to the piney background fabric, I accidentally laid one upside down and fused it to my iron. Instead of fusing it back into its original spot, I set it free above the pine cone and found a new direction for my piece: setting myself free from the quilt police and any of my own inhibitions about quilting.
Here are some of the things I freed myself from on this piece:
<1.> 
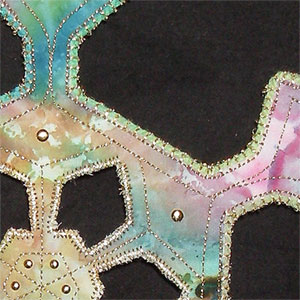
Laser sharp precision. I tore fabric (makes a great soft raw edge), cut freehand with the rotary cutter, left the appliqué edges very raw and left threads hanging. (btw, its actually more work than I expected to jag up those edges, they don't just happen on their own!).

<2.> Quilt sandwich conventions. I laid the quilt top on a larger piece of wool felt, added a few straight pins and quilted away. I started near the edges and machine quilted towards the middle. I decided to try a large stipple and do it fearlessly. (Usually machine quilting stresses me out. I really enjoyed it this time and didn't cross over my lines once even though I wasn't being very careful.)

<3.> Over-planning syndrome. (Sometimes when I plan out a piece too completely before I begin I can't bring myself to actually complete it because in my head its already finished.) Making this quilt was like doing a puzzle because I didn't know ahead of time what it would end up to be. I loved the surprises at every turn working on this piece.
I always enjoy a bit of hand work mixed in so I hand embroidered the path of the free pine cone scale, tying the knot on the front and leaving the tail free flowing.
Finally, I snapped a picture of the pine cone. Its not the same angle I was sketching and I have no idea which side I sketched from, but if you look at the top half of the pine cone you can still see the way the triangular tips of the scales stand out from the dark inside.

You can read some more musings about this quilt on my blog.

Thursday, March 01, 2007

It's Not Easy Being Green

(from Kermit the Frog)
11 3/4" X 9 1/4"

I took some artistic license and stretched the green all the way from chartreuse to turquoise, then the accent color, orange, drifted from nearly red to yellow (the eye, below), plus the black and white to cover the extreme value on both ends. So in the end, I know the quilt is not truly monocromatic with a single accent color, but I really wanted that frog to have his turquoise belly and red-orange eye.


It was a challenge to find the right greens in my stash. Then consider that the label fabric (photo below) was actually from my stash, and you'll have some idea of how I'm lacking when it comes to useful fabrics. If I want to continue in this style, I now have a better idea of what to buy when I'm fabric shopping.


I'm still learning how to assemble these. I had similar problems with the threads quilt last month: the fusible pieces not quite lining up/fitting exactly like in the pattern, how much/little overlap to include, etc. I'm learning though, and will work it out one of these days.
The quilting/appliqué was done in one step with smoke invisible thread, and a small bit of black. The sparkle in the eye is a hot-fix crystal.

I'm not sure how I got away from my black and white prints. I used to put them in every quilt I made. You're sure to see more of them in my work in the months to come.

Sunday, February 04, 2007

A penny for a spool of thread I


9.5"x9.5"

I had fun bringing out all my old black and white prints. I especially liked the part about the cropping; it was a challenge at first, but I will be sure to explore closely cropped images again. I like the way it gives a little sense of mystery. My original intentions were to make the still life more abstract, but in the end I decided realistic would be quicker since I wouldn't have to do so much trial and error to get the shapes, shadows, and everything right. A bad batch of Wonder Under caused the pieces to start falling apart, so I called it done at one border. The applique is raw edge, my first time not completely covering all the edges. I don't want to add a sleeve because that would cover up the picture (the border's only 3/4"). Any suggestions on how to hang it? If you want to see the top before the quilting, it's here on my blog.

Saturday, December 30, 2006

Goodnight, Moon

The book I chose was "Goodnight, Moon" by Margaret Wise Brown.
First line: "In the great green room there was a telephone..."
By Laura West Kong, size: 8 5/8" x 8 3/4", pieced and appliqued.

My mind was mush after the holiday rush so I chose something simple and fun. My inspiration was the stylish old telephone on the nightstand in the book, and the quilt project "Oak Leaves" in American Quilter, Winter 2006.

I changed the block from rectangle to square and replaced the leaf with the phone. Then I mixed up the squares to be random rather than in diagonal rows. I chose warm greens for the front because I thought they would contrast better with the black than cool greens. I wanted the fabric mostly to have good contrast, but with a little low contrast thrown in (the two darker value greens). In the book everything is all shadowy and moonlit. The lighter green star print is actually very similar to Clement Hurd's illustrations.

Everything is from my stash. I originally wanted to tilt the squares at an angle to add interest, but that was way too much math for my tired brain, so I offset the phone instead.

I tried out a variety of borders, but they all competed with the focal point so I opted for a fused black binding instead. I was also considering ways to include that fun curly telephone cord, but in the end chose to leave it off for simplicity's sake.

The quilting is done with my machine scallop stitch echoed around the phone. It is meant to be reminiscent of those curly telephone cords, as well as suggestive of a ringing phone. For the hanger I sewed a large jump ring to the back.

Sunday, December 03, 2006

let it snow!

Friday night I chose sleep over finishing my challenge on time. Last night I chose the challenge over sleep.

My quilt was inspired by the digital photography of Kenneth Libbrecht, whose work appears on the 2006 U.S. holiday postage stamps. I used elements of real snowflakes combined with elements from my imagination to sketch a snowflake of my own that could be real, and most importantly, could be realistically made into a quilt.

I chose two batiks, one for the front and one for the back so I could see what it would look like in different fabrics. As a bonus, that made it reversible! The batiks are fused to Timtex interfacing for the batting, and I used gold metallic thread for the edging and quilting.

First I applied yarn around the outer edges and used a machine overlock stitch on top, which turned out rather decoratively like that loopy-edged kind of ribbon. Then I echo-quilted the snowflake before cutting out the center windows with an X-acto blade. Next I zig-zagged around the windows, and finally added the hot-fix gold brads on the front. All in all, a very quick project!

I used fishing line to hang the quilt. The front is photographed in front of a black piece of fabric and the back in front of a purple-painted wall. Currently it's hanging from my kitchen light fixture as part of my Christmas décor. I like the way it gently turns round and round with the air currents. (I would have taken a picture, but it wouldn't have the same effect unless I figured out the video capabilities on my digital camera so you could see it rotating.) I am quite pleased with the way it turned out. Maybe I'll make one snowflake each winter and eventually have quite a collection.

Sunday, November 05, 2006

Mimsical

I learned my lesson on the first challenge and deliberately worked small this time (9 x 12, shrank down to 8 5/8 x 11 5/8 inches from all the quilting). When I began I had just finished "slaying" my DD's halloween costume, and this piece was meant to be in celebration of that accomplishment. I wanted it to be all happiness and light, ala Disney's version of Alice in Wonderland (just returned from a trip to Disneyland last week, so my head was full of bright, whimsical imagery).

As you can see, however, the fabrics I ended up choosing are anything but bright and cheery. I was rather surprised by how dark and menacing it came out. I don't usually work that way. I guess I've been more stressed out than I realized. I forgot the part about the textural element, and was relieved that my choices turned out to be very textural-looking patterns. That meant I didn't have to add anything more and could finish on time.

There is no special meaning to my images. I started with the dark curvy part at the bottom left. It is supposed to be a stylized sea. The orange and green parts are flowers and leaves in reference to the tree that was mentioned. Everything else in the poem I ignored, except the slaying part mentioned earlier.

Free-motion quilting finally clicked for me. When I pay attention to the rhythm of of the machine, kind of a tick-tock where the feed dogs would usually move the fabric forward, I move the fabric along with it. Fast or slow, this turns out right. The moment my mind starts wandering is when the stitching goes awry. I was very pleased with the jerky nature of the quilting around the appliques. It seemed to fit the mood of the piece, although would not go well in everything I do.

The binding is fused and machine stitched, 1/2 inch strips folded in half and ironed down to make approximately 1/4 inch binding. The mitering is cut. I did not sew or fold the miters.

I am anxious to hear any and all comments and critiques about the design, workmanship, what the imagery reminds you of, etc. I love to hear new viewpoints that I'd never thought of and you won't hurt my feelings in the least.

No matter how many times I tried to upload the detail image, I couldn't do it, so here is the Yahoo link to it: http://ph.groups.yahoo.com/group/fastfridayfabricchallenge/photos/view/9f0f?b=54.

Friday, October 20, 2006

Autumn's Transition--Photoshopped

Hi Julie,
Here's the photoshopped version of your quilt critique. You can move it underneath your post, delete it, or whatever. Hope it helps. The truth is, a picture is worth a thousand words, and I was getting weary of all that wordy explaining without being able to simply point at what I mean and move on. I'm more of a visual person.

I changed some of the colors' saturation and values, shifted the center tree a bit and made it a little larger, and faded the back tree more into the background, as well as removed the brown hill of leaves. I also narrowed the third band of green so it would appear to lie flatter.

laura kong (diva of quilts)