
Sunday, August 28, 2022
Tuesday, July 20, 2021
Task 3 Ricky Chestnut
As a dyer, stitcher and picture taker I will send three pictures of work I have done. The little finch is buried in a MONOCHROMATIC sea of green, in my back yard.
My kaleidoscope stars are a hand stitched study in COMPLEMENTARY colours.
And I have a sample of analogous colours from yellow to red of my hand dyed cotton. This was from a 12 step colour wheel I made.


Tuesday, January 06, 2015
Aquatic Symmetries

For this challenge, I combined #62 from Wendy Wetzel, "Notan" and Pam Harris's #43, "Under the Sea" -- and while combining those would give me the wonderful title "No Tan Under the Sea", I decided not to inflict that on you!
Notan involves the use of pieces cut from one side and "reflected" on the other, and I realized as soon as I got started that picking a batik was a fortunate choice! I started with the vertical line of reflection from a piece of the batik, then made a curved cut that would cover a missing piece of the background fabric. It then seemed only logical to add a few more cut-outs in those lines -- and I could put in scraps of the blue behind those shapes!
And because they seemed to need it, I used fabric paint for the eyes of the fishes.
It's been a wonderful run for the Fast Friday Fabric Challenge. I thank you all for participating!
Thursday, January 01, 2015
Another Annual Resolution!


I loved looking at past challenges. This quilt was inspired by Challenges #77 Touchy-Feely and #55 Dance and
Movement.
Tried a new technique with threads from a book, Stitch Draw by Rosie James.
It was designed and cut in Make the Cut software. Materials include net, trims,and threads.
I did two versions ..which one do you like better?
Thursday, December 25, 2014
Challenge 100: What Have I Missed?
Challenge 100, December 26, 2014
Challenge Hostess: Tobi Hoffman
and 49 others
Title: What have I missed?
Theme: Finding the best of the past challenges
Technique: Any
Due date: January 3, 2015 – or whenever you finish!
The
Fast Friday Fabric Challenge started back in September 2006, and our final
challenge presents a time for a retrospective.
There is no member who has done and posted every challenge, so for this one
hundredth challenge, I ask everyone to look back through the previous 99, and
select a theme from one challenge and a technique from another – or combine
themes and techniques from several of them, as many as you want, and whatever
parts from any of the challenges that you want.
We all have learned to use various aspects that have enhanced our work,
both for these challenges and for other projects, and I hope it has been an
enjoyable and profitable experience.
Feel
free also to look through all that has been posted – but be warned that this is
eye candy that consists of 1820 published posts (including this one, of course). 100 are the challenges themselves, and 5 are “how
to post” instructions, but that leaves 1715 pieces of art! While you’re at it, feel free to add
critiques for those that catch your eye.
And
while this may be the final challenge, if you ever feel to come back for
something further to do, this one is always open for you!
Resources:
http://tinyurl.com/FFFC-100
- the link to all the challenges.
Because most of the challenges themselves contain links, and because it
would make no sense to do so, I am not including any other links.
And one more thing: have fun with this! :)
Friday, December 12, 2014
Orchard

Earlier this fall I had gotten scraps of that tree fabric in brown and green from my quilt guild, and was so delighted to be able to make use of them here! An orchard combines the sense of order of planted trees with the individual way that each of the trees grow. It makes me think of the fresh outdoor air and the anticipation of the harvest at the season's end. And the wider than normal proportions of this piece (I don't choose the dimensions so much as the picture does!) makes me long to go outside in early spring and just spread my arms wide and take a deep, deep breath.
I welcome your comments.
Monday, December 01, 2014
Next Step
"The Kiss" thus far. I've pieced background using Jaffe Fassett's shot cottons. I plan to quilt the silhouette and put over the background. Thinking I might add lighter circles to mimic cartoony imagery in pic. 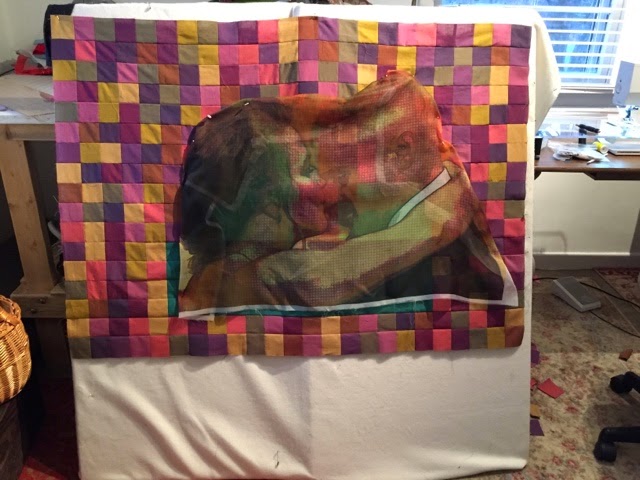
This is certainly a challenge. I'm on a path to finish it up.
Have a few challenges in my mind right now. Like having that diversion. Sketching. Thinking
I've been awake since 3:30 AM. Almost ready for bed!
I have learned:
1. $1900 to rebuild transmission. Ugh. Seriously. Ugh
2. Printers + ink. Another ugh.
3. Must pass on Elizabeth Barton's master Class in art quilting. A year long commitment and the price tag prohibit.
4. I love Amy's Vegetable Lasagne mm
5. I need more vacation days.
Sunday, November 30, 2014
WIP...The Kiss
.
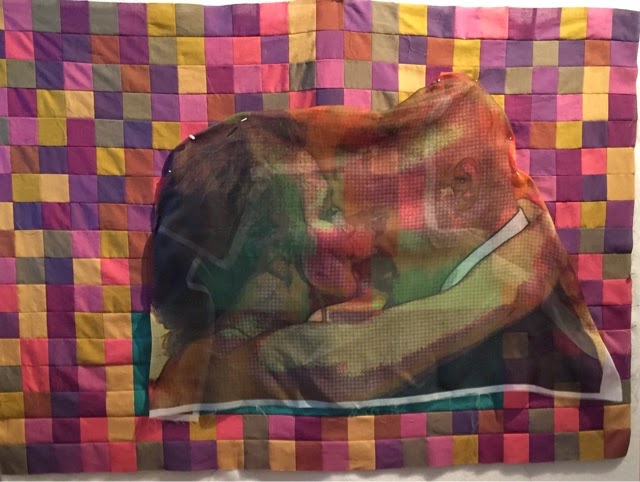
 I am loving the way this is moving along.
I pulled this print on organza out last week. It's about 2 years old. Michael and Jenn married in June, 2012. This ipic is of them at the wedding. I manipulated the it in befunky.com into a cartoony image.
The squares are 2" sewn with Kaffe Fassett's shot cottons.
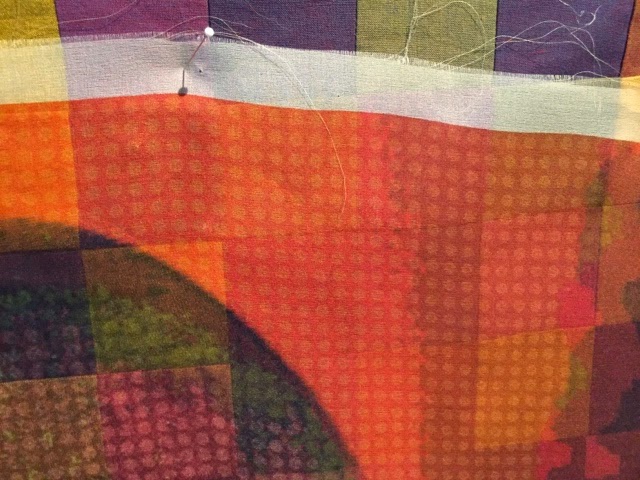
I plan to add circles to the squares with the lighter color fabric to mimic the dots on the print.
Julie, of Red-Dog Enterprises printed the image for me.
Spent a couple days at Julie's house this weekend. Her son was home on break. We all just hung out, knitted, crocheted, mono printed while Robbie worked tirelessly on homework! We watched movies on Netflix. Such a great respite. Good for the soul.
Jenn is teaching herself to knit! She's made a scarf for herself and a hat for Maddi. I am cleaning out and sending her some yarn stash.
Massage tomorrow. Diana Radley, on e main St in Batavia is excellent if you thinking about getting or giving a gift to someone.
I have learned:
1. I miss knitting. Made a skinny scarf this weekend from a skein of yarn.
2. This Ferguson, MO. debacle is just a shameful commentary on race relations.
3. I want a Dons of Anarchy hoodie. Saw woman wearing one this weekend.
4. Mela is a tornado!
5. Maddi is rolling over, right on target.
6. Season finale of " Homeland" season finale was a heartbreaker.
7. Look up Annie Lennox's version of "I Put a Spell on You". Great rendition.
Thursday, November 27, 2014
Challenge 99: Ambience
Challenge Hostess: Susan Slesinger
Title: Ambience
Theme: Creating atmosphere
Technique: Use of color to achieve
atmosphere/ambiance
Due Date: Dec. 6, 2014
Webster’s New Collegiate Dictionary provides five definitions of the noun
“atmosphere.” The fifth definition is
pertinent to this challenge:
5a “the overall
aesthetic effect of a work of art”
5b “a dominant emotional
aesthetic or emotional effect or appeal”
It defines
“ambience” as “a surrounding or pervading atmosphere”
This month’s challenge
is to try to create an “atmosphere” or ambience using color to suggest a
season, time of day, or mood without making obvious references to it. You may want to give yourself a “sub”
challenge to use a palette which is different to your normal repertoire. For example, if you usually use bright, bold
colors, try using a pastel, soft palette instead. If you want an analogy for what you are
trying to create, think about film scores.
Music is often used to create the scene in a non-verbal manner, such as
the shower scene in Hitchcock’s Psycho. I encourage you to try to listen to some
instrumental film music without watching the film.
To get
yourself in the mood for creating an atmospheric piece, you might choose to
listen to some “classical” music which is trying to set a scene through
non-representational means. If you have
access to a streaming music site you will get much better recordings, but if
not, these You-tube videos will give you a taste of atmospheric/descriptive
music. (I recommend listening without
watching the picture!)
Resources:
Vivaldi The Four Seasons https://www.youtube.com/watch?v=GRxofEmo3HA
Ligeti’s Atmosphere https://www.youtube.com/watch?v=aI0P1NnUFxc
Examples:
How painters
have created ambience:
Marc Chagall
JMW Turner
watercolors:
Willard Leroy
Metcalf Winter’s Festival http://art.famsf.org/willard-leroy-metcalf/winters-festival-4753
This article
from the Chicago Art Institute illustrates how Monet created different
atmospheres in his Stack of Wheat series through subtle changes in color and style. http://www.artic.edu/aic/resources/resource/380
In the quilt
world, these are some examples of different ways of expressing ambience:
Barbara
Oliver Hartman:
Ruth Powers
Patty Hawkins
·
Colorado Gold http://www.pattyhawkins.com/Pages/Gallery1.html (part way down page). Also At
Dusk and At Sunrise (nearer
bottom of page)
Cat Larrea
Sue Benner
Get out of
your comfort zone and have some fun with this -- even if you have to work
small!
Saturday, November 15, 2014
Flower Garden
 13" x 20"
I'm generally a vegetable gardener, but that was simply too many letters! I liked that "flower" had the same number of letters as "garden" so that each flower letter could grow out of a garden letter. I pulled out various of my floral and leafy fabrics for the letters and put them against a couple brown earthy fabrics. I mount my pieces on foam core, with the fabric wrapped around to the back, actually stitching through the foam core (it's not hard, just use a thin needle!), and used pebble beads to avoid the dimples that otherwise form in the fabric, and regular beads in the upper part.
I'm just a bit later than usual this time! Comments welcome.
Sunday, November 02, 2014
Fall

Ticia
Tuesday, October 28, 2014
Words
I make a lot of quilts using words, but for meaning more than as artistic elements. This quilt is the opposite. There is no meaning, but I had fun with the letters. Several background fabrics that have words printed on them demanded to be in the quilt.

Monday, October 27, 2014
Supercalifragislisticexpialidocious

Supercalifragislisticexpialidocious, was a favorite childhood song from Mary Poppins.
At the website, http://www.tagxedo.com/ typed the text, Supercalifragislisticexpialidocious,chose the font, color and shape to create the design. Such Fun!
Thursday, October 23, 2014
Challenge 98: Word Play
Challenge Hostess: Tobi Hoffman
Title: Word Play
Theme: Alphabet Soup, letters as
artistic elements
Technique: Any
Due date: Nov. 1, 2014
Do
you have a favorite word, one that just tickles your mind, maybe with its sound,
maybe its meaning? Do you remember as a
child taking a word and repeating it so many times that it seemed like a
nonsense word? Is there a word that
others might apply to you, whether because you use it so often, or just seems
the perfect one to describe yourself? Or
maybe you’re a punster, getting joy out of a play on words, or enjoy crossword
puzzles, especially the tricky kinds.
The challenge this month is to use words in your quilt to create your
picture. Use color to accentuate the
mood.
Resources:
Wordle: http://www.wordle.net/show/wrdl/8257311/Word_Play
created from
the initial paragraph by yours truly
“Word Play Quilts” (check out the 16 pictures from the book):
And its author, Tonya Ricucci: http://www.pinterest.com/tonyaricucci/
Tammy Johnson,
author of “Alphabet Soup: Expressive Quilts with Folk Art Charm” http://tinyurl.com/FFFC98-2 or
and
some samples:
And one more thing: have fun with this! :)
Monday, October 06, 2014
Z Barcode
12¾" x 16"
11/24 -- I updated this a bit by adding black and white beads around the inner edge of the border to emphasize the barcode pattern. It very much perked up the piece, I think!

The most natural thing I could think of incorporating a bar code was a zebra, hence, Z Barcode!
I used two widths of black ribbon for the bar code, with a Micron pen to put in the smaller code stripes on the mane, head and legs. The background is simply a dyed piece from my stash, and bordered with bias tape. I sewed the basic zebra shape onto black to give it enough outline to stand out against the background, and used what I call the "scribble" stitch on my machine around the edge of the black.
I welcome your comments.
11/24 -- I updated this a bit by adding black and white beads around the inner edge of the border to emphasize the barcode pattern. It very much perked up the piece, I think!
 |
| Original post |
The most natural thing I could think of incorporating a bar code was a zebra, hence, Z Barcode!
I used two widths of black ribbon for the bar code, with a Micron pen to put in the smaller code stripes on the mane, head and legs. The background is simply a dyed piece from my stash, and bordered with bias tape. I sewed the basic zebra shape onto black to give it enough outline to stand out against the background, and used what I call the "scribble" stitch on my machine around the edge of the black.
I welcome your comments.
Friday, October 03, 2014
Count your Smiles!


Designed this quilt using a free bar code generator, Make the Cut software and Photoshop Elements Filters.
The top block actually reads Count your Smiles! with a QR scanner.
The center block was created with a spherize filter.
The bottom block was created with a line drawing filter.
The borders have UPC bar codes that spell the text.
Would love suggestions on how to quilt it.
Thursday, September 25, 2014
Challenge #97: Barcode Art
Fast Friday
Fabric Challenge 97, September 26, 2014
Challenge Hostess: Meena Schaldenbrand
Title: Barcode Inspiration
Theme:
Use of barcodes
Technique: High contrast fun
Due date: October 4, 2014
Barcodes are composed of black and white thick and
thin lines on many purchased products. UPC barcodes use strong lines. QR
barcodes use geometric shapes.
For challenge # 97, use barcodes to create high
contrast fiber art.
What do bar codes mean? UPC is
short for Universal Product Code, 12-digit barcode which allows retailers to manage
sales of a product. UPC codes are valid in the United States and Canada. EAN codes are a 13-digit barcodes valid in all
other countries.
Barcode explanations:
http://www.barcodeart.com/artwork/collages/diagram/index.html
http://www.barcodeart.com/artwork/collages/diagram/index.html
Quilts:
Other Art Examples:
Barcode Gallery: http://www.cnet.com/news/barcode-gallery-qr-codes-become-wall-art/#
Turning them into art: Scott Blake
http://theinspirationgrid.com/barcode-art-by-scott-blake/
http://www.barcodeart.com/artwork/collages/index.html
http://www.barcodeart.com/artwork/videos/index.html
http://www.barcodeart.com/artwork/index.html
http://theinspirationgrid.com/barcode-art-by-scott-blake/
http://www.barcodeart.com/artwork/collages/index.html
http://www.barcodeart.com/artwork/videos/index.html
http://www.barcodeart.com/artwork/index.html
12 Coolest
Works of Barcode Art by Grace Murano
http://www.oddee.com/item_96851.aspx
Art in Aisle 5: Barcodes Enter Expressionist Period
http://www.oddee.com/item_96851.aspx
Art in Aisle 5: Barcodes Enter Expressionist Period
http://online.wsj.com/news/articles/SB10001424052702303823104576391973120779678
or http://tinyurl.com/FFFC97-1
or http://tinyurl.com/FFFC97-1
Variations on barcodes: http://www.tumblr.com/tagged/barcode-art
http://www.trendhunter.com/trends/funky-barcodes-spice-up-packaging-ii
Art barcode graffiti
https://www.google.com/search?q=bar+code+art&es_sm=93&tbm=isch&tbo=u&source=univ&sa=X&ei=2FETVKXvCs2uyASCsoHIDg&ved=0CEYQsAQ&biw=1120&bih=578#tbm=isch&q=art%20barcode%20graffiti&revid=2125053464&imgdii=_
or http://tinyurl.com/FFFC97-2
Barcode "Clock"
http://www.barcodeart.com/artwork/clocks/barcode/index.html
A Fast Friday Fabric
challenge based on the barcode http://meenaschaldenbrand.blogspot.com/2013/12/just-when-caterpillar-thought-world-was.html or http://tinyurl.com/FFFC97-3
And one more thing -- have fun with this!
Wednesday, September 10, 2014
National Honey Month
This is not done yet, as you may be able to tell..lol
I have no less than THREE other pieces started for the challenge but kept changing my mind. First was Elephant Appreciation Week, then Good Neighbor Week, then Bathtub Race Day before finally settling on this one to complete. I am posting the WIP photo because I feel a bit guilty that as hostess this month I haven't posted anything yet!
Originally this was going to be the honeycomb quilt hanging from a thin branch with some bees on it. But it has taken on a life of its own. The honeycomb was drawn on a yellow mottled batik, then colored in with colored pencils, and then "honey" was painted on with acrylics, I fused it to batting, then fused that to more fabric so it is very stiff, hemmed the edges (using pliers,,,used the extra heavy fusible...sigh) stuck wire through the top hem so I could hang it and stitched the bottom edges together to make the shape I wanted.
Nailed the branch to a 2x4, THEN decided to make b/w checks on that with acrylics. The honey jar is an empty one I had here and the honey is painted canvas I put inside it. That will have a label when done also.
The bees are painted canvas, pipe cleaners and trimmed pompoms, still need to make wings and antennae, they won't all be on the honeycomb, I plan on having one on the branch and maybe one on the honey jar or "flying" under the comb, not sure yet,
I will post a photo when this is complete, but did want to share something with you now :-)

 Update: I have been able to squeeze enough time out to finish one bee! Have great hope that the rest will be done before the next challenge :-) Here is a photo of the complete bee, I have since painted along the outer edges so it is black and not the light color that you see here.

I have no less than THREE other pieces started for the challenge but kept changing my mind. First was Elephant Appreciation Week, then Good Neighbor Week, then Bathtub Race Day before finally settling on this one to complete. I am posting the WIP photo because I feel a bit guilty that as hostess this month I haven't posted anything yet!
Originally this was going to be the honeycomb quilt hanging from a thin branch with some bees on it. But it has taken on a life of its own. The honeycomb was drawn on a yellow mottled batik, then colored in with colored pencils, and then "honey" was painted on with acrylics, I fused it to batting, then fused that to more fabric so it is very stiff, hemmed the edges (using pliers,,,used the extra heavy fusible...sigh) stuck wire through the top hem so I could hang it and stitched the bottom edges together to make the shape I wanted.
Nailed the branch to a 2x4, THEN decided to make b/w checks on that with acrylics. The honey jar is an empty one I had here and the honey is painted canvas I put inside it. That will have a label when done also.
The bees are painted canvas, pipe cleaners and trimmed pompoms, still need to make wings and antennae, they won't all be on the honeycomb, I plan on having one on the branch and maybe one on the honey jar or "flying" under the comb, not sure yet,
I will post a photo when this is complete, but did want to share something with you now :-)


Tuesday, September 09, 2014
Suicide Prevention Week

12/30/14 I decided to get this piece truly finished before the end of the year. I strengthened the text, and put the quote on a separate piece of fabric as a tombstone, I used a pillowcase backing with a hanging sleeve, and a black fringe on the bottom. I trimmed the drapery and put Fray Check on the edges, and decided not to actually sew it down but let it flare a bit.
_____________________________
Size: approx. 24" x 18"
About the time I posted this challenge, I saw an article in the editorial page from someone who had been stopped from suicide, and it mentioned National Suicide Prevention Week. Sept. 10th is World Suicide Prevention Day, and the national week is the week including that date (though the article gave a later date for the week). The recent death of Robin Williams immediately came to mind.

I took a photo of him that I found on-line, photo-shopped it, keeping his eyes blue but changing everything else to grayscale, and printed it on white linen. I used wood grain fabric for the coffin, and wrote it the words. I added the rose, done with foil, in part because the words weren't quite centered in the space, but it does seem to balance the picture.
The quote, ironically, is Williams' own words. Who knew he was struggling so much in his private life?
Normally I would mount this on foam core, wrapping the edges evenly, but I am not completely happy with this piece. I welcome any suggestions.
Wednesday, September 03, 2014
The Optimist


Positive
Thinking Day is Sept
13.
The Optimist is about improving life with a positive
attitude.
Materials: Light
bulb, cloud with rain beads, ladder, and thumbs up charms. Key.
Doily.
Technique: Designed
in Make the Cut software, printed on fabric. 3D Attic window.
Monday, September 01, 2014
Ole'

When I saw the list of possibilities for this challenge, it motivated me to start and finish a quilt I had been planning for a long time. So it became a celebration of National Spanish Heritage Month and National Chicken Month.
I have been saving fabrics that looked Mexican, and I will add this to my series of roosters that I have been working on this summer.
This measures about 17" x 18", and is all commercial cottons, fused and machine quilted.
I enjoy using fabrics in unusual ways, and the tail feathers are from a Laurel Burch print of horses, and the wings holding the maracas are from a very colorful tropical fish fabric...
It was lots of fun, fussy cutting each and every feather, and seeing it come together as I added them on, one by one.
This was a great challenge - very open-ended and accessible!
Thursday, August 21, 2014
Challenge #96: September Holidays
Fast Friday Fabric Challenge 96, August
22, 2014
Challenge Hostess: Catherine
Lewis
Title: September Holidays
Theme: Celebrate a Holiday!
Technique: Any
Due date: Aug. 30, 2014
Theme:
"Congratulations! You have been
chosen to create a poster for one of the holidays celebrated during the month
of September. Browse through the lists and when you see a holiday that
catches your eye, tugs at your heart or simply tickles your funny bone, let
your imagination and creativity loose to run wild.
Techniques:
Anything goes for this challenge! Use
bright colors or somber, an abstract design or a very realistic one. Let
the "mood" of the holiday you chose tell you in which direction to
go, no matter how quirky that direction may be! You may choose any holiday
that you like, whether it's a monthly, weekly or daily observance. All I
ask is that it grabs the viewer's attention and truly represents the meaning of
the holiday.
Words are optional on your poster, if you can convey the meaning
of the holiday without them, that's fine, although I would be interested in
seeing unique ways to add them if you choose to do so.
The only real requirement for this challenge is that you have fun
doing it!
Resources:
A list of normal and not so normal holidays may be found here:
http://www.brownielocks.com/september.html
http://www.brownielocks.com/september.html
and also here:
http://holidayinsights.com/moreholidays/september.htm
http://holidayinsights.com/moreholidays/september.htm
As you may imagine, it is a bit hard to find art or quilts to serve
as inspiration for this challenge, but I have found a few to share with you. Of
course these are all not so fast quilts to make, but they are just to inspire!
This would be great for Read a Book Day...you'll need to scroll
down to see it, the second quilt:
http://aliceslookingglassblog.blogspot.com/2010/11/festival-part-one.html
or http://tinyurl.com/FFFC96-1
Global Warming quilt:
http://beadlust.blogspot.com/2009/11/dees-over-at-works-in-progress-reminded.html or http://tinyurl.com/FFFC96-2.
Alzheimer's Awareness art quilt: http://shelburnemuseum.org/webMedia//2010/05/Quilt-Sylvia-A-Lifes-Journey.jpg or http://tinyurl.com/FFFC96-3.
This would be good art to use for National Peanut Butter and Jelly
Day: http://caroljosefiak.blogspot.com/2014/07/july-7-2014-this-is-last-painting-in-my.html or http://tinyurl.com/FFFC96-4,
And if none of
the September “holidays” appeal to you, make up your own!
And
one more thing: have fun with this! :)
Friday, August 15, 2014
Challenge template
Fast Friday
Fabric Challenge #, release date
Challenge Hostess:
Title:
Theme:
Technique:
Due date:
[challenge
description]
Resources:
[links
to illustrative quilts, non-quilt artwork, background for theme/technique
And one more thing: have fun with this! :)
Thursday, August 07, 2014
Ominous Strangers

I machine-basted three pieces of fabric together and tried
Matisse’s improvisational style of cutting, but having shapes in mind based on
Eric Freitas’ steampunk clocks (which are really fascinating, and you should
check them out).
When the pieces were cut, un-basted, and laid out, they
seemed to suggest one of those scenes from an old western where a trio of
silhouetted, gun-slinging hombres saunters into town…possibly with ill intent
-- hence the name. Before machine
appliqueing the figures, a watery wash was added at the bottom of the background fabric to hint at
shadows and a foundation so the pieces wouldn’t just float on the white
background.
The piece is 22” x 28”.
Feedback is welcomed.
Robert Hartley
Sunday, August 03, 2014
Window with Flowers
Aug. 19, 2014 I've done a bit of enhancement to Window with Flowers: beads and a bit of foil in the flowers, and some fabric paint to add the clouds in the window. I tried using deColourant to change the blue to white, but it brought out a bit of yellow instead.
---------------------
21½" x 21"
 I have a set of five fat quarters which are different colorways of the same pattern, and I finally got to use four of them! Normally I would cut leaves and flowers individually, going with the patterns on the fabrics, but for this project I folded and cut several at once, using the little pieces between the cuts for the stems. I chose a dark green thread to satin-stitch the leaves and stems in order to give them better definition.

The bright red fabric (the source of tomatoes in an earlier Fast Friday piece!) pushed itself forward as the unlikely background, with the blue fabric becoming window panes. I quilted lines in the lower part to indicate a table surface, and lastly, added a few dead leaves around the flower pot.
Thank you, Lisa, for a fun challenge. Comments welcome as always!
---------------------
21½" x 21"
The bright red fabric (the source of tomatoes in an earlier Fast Friday piece!) pushed itself forward as the unlikely background, with the blue fabric becoming window panes. I quilted lines in the lower part to indicate a table surface, and lastly, added a few dead leaves around the flower pot.
Thank you, Lisa, for a fun challenge. Comments welcome as always!
Friday, August 01, 2014
The Shell Game


The quilt is a result of
three different challenges and will definitely become larger. The paper dolls represent
the illegals at our border.
The
"transparent" government is playing a shell game hiding the illegals
across the country in order to "protect" their privacy. But they
don't inform the American citizens and communities who will pay for the
illegals' housing, healthcare,
education and other financial support.
If the illegals want to
experience the American dream why not come here through the legal process and
earn American citizenship instead of breaking and entering?
My Orange Hat

I use these challenges as a way to try new techniques, and in this quilt I tried improvisational strip piecing and also used a flange in the knife edge finish. I was so glad to have "The Ultimate Guide to Art Quilting" by Linda Seward on hand - it helped get me past the first time terrors.
Since I'm hosting the challenge and mentioned free-form, I figured I'd have to try it. My goal was to get the feeling of paper doll chains, and I'm pleased with the result. My piecing improved from start to finish, so I'm also pleased about that.
I'm less pleased with the placement of the four-patch section on the lower left. I wanted a touch of orange other than the hat, but it would be better if it extended to the edge, or had white space above it and below the blue bodies, or both.
That's it for today - for some reason I feel very motivated to clean the studio & storeroom, so that's an opportunity that's not to be missed! Thanks for looking!
Thursday, July 24, 2014
Challenge #95: Running with Scissors
Challenge Hostess: Lisa White Reber
Title: Running with Scissors
Theme: A quilt inspired by paper cutouts, like those
by Matisse
Technique: Applique is the most obvious. Can you do it with piecing? Free-form?
Due date: August 1, 2014
Theme:
Did you like cutting out paper doll chains
when you or your relatives were little? Remember cutting out paper snowflakes
or five-pointed stars? Have you seen Scherenschnitte? All of these are design
resources for this month’s challenge.
[Note for our quiltart members: this
challenge was written up shortly before the recent Facebook discussion and the
creation of the “Running with Scissors” blog that began as a blog entitled “Friends
of Quiltart”. I debated changing this
challenge name, but couldn’t decide on anything better. And after all, this came first! – Tobi]
Resources:
Quilts:
A FFFC challenge piece: http://www.tobicollage.com/collages-2010/happy-dance.htm
http://fastfridayquilts.blogspot.com/2014/06/monets-rex-begonia.html
This is really Matisse, but I had a brain cramp when I first posted, and can’t
change the hyperlink.
Results of a Google image search
for Hawaiian Applique:
https://www.google.com/search?q=hawaiian+applique&rlz=1C1CHAF_enUS438US439&es_sm=122&source=lnms&tbm=isch&sa=X&ei=QzC8U5CwHaeksQTS-4GADw&ved=0CAcQ_AUoAg&biw=1295&bih=683
or http://tinyurl.com/nplpdjk
Applique
with Folded Cutwork by Anita Shackelford (http://www.amazon.com/Applique-Folded-Cutwork-Anita-Shackelford/dp/1574327232)
Papercuts
and Plenty
by Elly Sienkiewicz (http://www.amazon.com/Papercuts-Plenty-Baltimore-Beauties-Beyond/dp/0914881906)
Non-quilt work:
Results of a Google image search: https://www.google.com/search?site=&tbm=isch&source=hp&biw=1295&bih=683&q=matisse+cutouts&oq=matisse+cutouts&gs_l=img.3..0l10.3257.5620.0.5891.15.9.0.1.1.0.417.1270.2-1j2j1.4.0....0...1ac.1.48.img..10.5.1277.j6KG8JDzrjY&gws_rd=ssl
or http://tinyurl.com/ol8sdd7
How to fold a 5-pointed star: http://www.ushistory.org/betsy/flagstar.html
One blog by a Scherenschnitte
artist: http://papercutting.blogspot.com/
And one more thing: have fun with this! :)
Subscribe to:
Posts (Atom)


